
Table Of Contents
Bike Light Beam Patterns Explained: Flood, Throw, Beam Angle and Glare
A bike light beam pattern describes where a lamp sends its light, not simply how much light it produces. Flood beams spread output across a broad area. Spot or throw beams concentrate it farther ahead. Hybrid beams combine a stronger centre with surrounding spill, while cut-off road beams limit upward light to reduce glare. The right pattern depends on speed, route shape, surface and whether the lamp is mounted on the handlebar or helmet.
That is why two lights with the same lumen rating can give very different views. Useful road illumination comes from the interaction of output, optics, aim and mounting stability. Choose the beam for the job first; then confirm that its lumen level and runtime are sufficient.
What Is a Bike Light Beam Pattern? The Short Answer
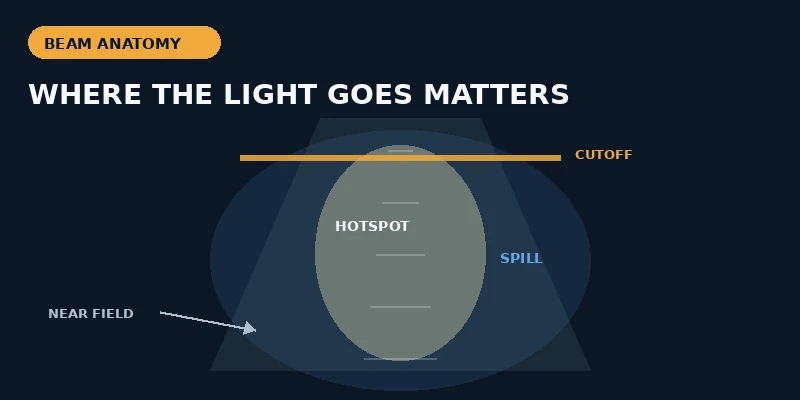
A bike light beam pattern is the spatial distribution of light leaving the lens or reflector. It determines how much light reaches the near field, the centre of the route, the edges and the distance ahead. A pattern may include a hotspot, surrounding spill, a horizontal cutoff or several optical zones.
For a rider, a useful pattern answers three questions at once: Can I see far enough ahead for my speed? Can I read the road or trail edges? Does the lamp keep unnecessary light out of other people’s eyes? A high lumen number cannot answer any of those by itself.
For a product manager or buyer, beam pattern also affects the entire design brief. A wider pattern can require more total output to maintain intensity across the field. More output increases power and thermal demands. A longer-throw optic may improve distance but reduce peripheral awareness. The mount must hold the exact aim on rough surfaces. Optics, battery, housing and bracket therefore need to be evaluated as one system.
Bike Light Beam Pattern Basics: Flood, Spot and Hybrid Beams
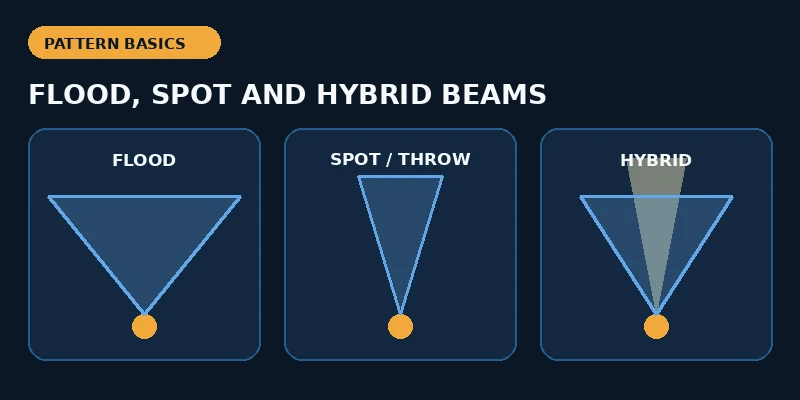
A flood bike light beam pattern spreads light across a wide area. It helps the rider see road edges, trail entrances, nearby obstacles and movement from the sides. Flood is valuable at slower speeds, through tight turns and on technical trails where peripheral information guides line choice. Its limitation is reach: spreading the same output over more area reduces intensity at any one point unless total output also rises.
A spot or throw pattern concentrates light into a smaller angle. It can reveal a distant bend, sign or surface change earlier, which is useful at higher speeds on straighter unlit routes. A tight hotspot can, however, leave a dark near field or weak edges. It can also cause uncomfortable contrast: the eye adapts to the bright centre while information outside it becomes harder to read.
A hybrid pattern combines a stronger central zone with wider spill. A good hybrid gives enough reach for speed while preserving context at the sides. The term itself is not standardized, so buyers should inspect the actual distribution rather than relying on the label. Some hybrids are broad floods with a mild centre; others are narrow spots with limited spill.
No pattern wins in every setting. City riders often benefit from a controlled road pattern. Fast road riders need reach without excessive upward glare. Mountain bicycle lights usually need broader coverage, and a dual setup can divide the job between a wide bar light and a narrower bicycle helmet light.
How Bike Light Beam Angle Changes Width, Intensity and Throw?
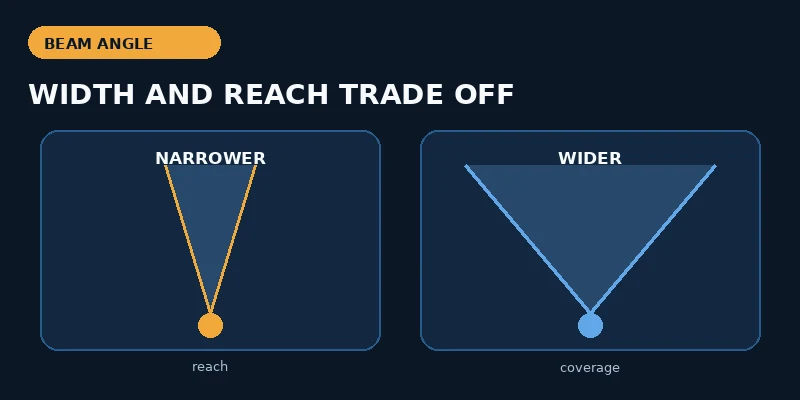
Bike light beam angle describes the angular spread assigned by a manufacturer, but the measurement convention is not always stated. A wider angle generally illuminates more area close to the bicycle. A narrower angle concentrates more of the available light and can increase perceived reach. Neither description proves the beam is uniform or useful.
Consider an 85-degree beam and a much narrower spot with the same total lumens. The wide beam may illuminate shoulders and corners but appear less intense far ahead. The spot may create a strong central patch but leave peripheral areas dark. The result also depends on reflector efficiency, lens transmission, hotspot shape and how much output is sent above the rider’s useful field.
Beam angle should therefore be read with lux or candela data when available. Lux indicates illuminance on a surface at a specified position. Candela indicates intensity in a direction. Both need test conditions. “100 lux” without a distance is incomplete, and “150 metres” without a stated threshold does not reveal how much useful light reaches the surface at that distance.
A beam photograph adds context only when the camera exposure, white balance, lamp mode, battery state, mounting height and scene are controlled. A wide-angle marketing photograph can exaggerate spread; an overexposed image can make weak spill look brighter than it is. For direct comparison, request identical test conditions across models.
How a Cut-Off Bike Light Beam Pattern Controls Glare?
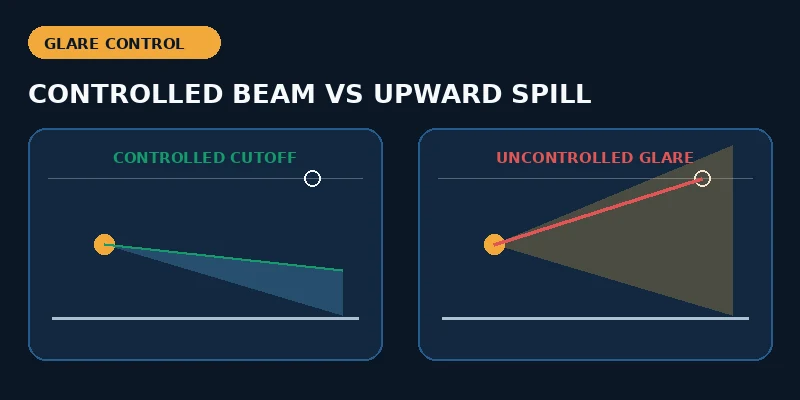
A cut-off bike light beam pattern uses the optic to form a defined upper boundary. The objective is to direct more light onto the road and less into the eyes of oncoming cyclists, pedestrians and drivers. A horizontal or shaped cutoff is especially useful on shared paths and roads where people approach from the opposite direction.
Cutoff is not the same as “dim.” A well-designed road beam can use its available lumens efficiently below the horizon. It can also improve visual comfort for the rider because uncontrolled foreground glare and bright reflections reduce contrast beyond the hotspot. The benefit depends on correct orientation: a cut-off lamp rotated or aimed too high can still dazzle.
There are tradeoffs. A strict cutoff may provide less light above the horizon for signs, overhanging branches or steep trail features. Some products add a separate high beam for open or off-road sections. That high beam should be lowered around other road users because it restores upward light and glare.
A cutoff claim does not automatically prove compliance with any country’s lighting rules. Approval depends on the applicable standard, the tested product configuration and the target market. Check the actual marking or documentation instead of treating the beam shape as a certification.
Which Bicycle Front Light Beam Pattern Fits City, Road and Trail Riding?
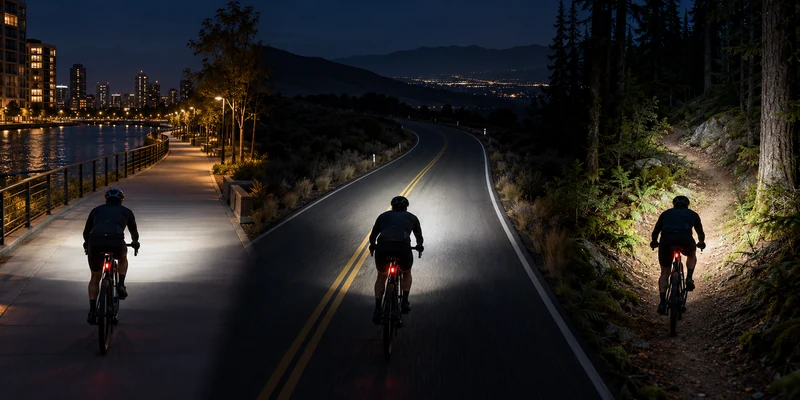
The appropriate bicycle front light beam pattern follows the route’s visual task:
| Riding environment | Useful beam direction | Main risk to check |
|---|---|---|
| Well-lit city streets | Controlled, moderately wide road beam with side visibility | Excessive glare and a hotspot that adds little useful information |
| Shared paths | Smooth near-to-mid field with a clear upper boundary | Dazzling walkers and oncoming riders |
| Unlit roads | Balanced throw with enough spill to read edges and bends | Tunnel vision from a narrow centre or wasted upward light |
| Fast descents | Longer reach with stable aim and a usable near field | Mount movement, abrupt contrast and insufficient high-mode runtime |
| Gravel | Hybrid beam with road reach and wider surface context | Loose-surface detail disappearing outside the hotspot |
| Technical trail | Broad handlebar flood, optionally paired with a helmet spot | Shadows, tight corners and pointing a helmet beam at other people |
A mixed route may require several modes or optical zones. When moving from streetlights to an unlit lane, the rider should be able to increase useful output without cycling through a disruptive flash pattern. When returning to traffic, a lower steady mode and correct aim can reduce glare. Mode design and beam design therefore belong in the same usability review.
For bicycle lights for night riding, avoid choosing from a wall shot alone. A wall reveals shape and cutoff, but it does not show how the pattern reads a real surface at speed. Use both a controlled wall image and a road or trail image, then confirm the runtime of the mode shown.
How to Aim Bike Lights for Night Riding Without Avoidable Glare?
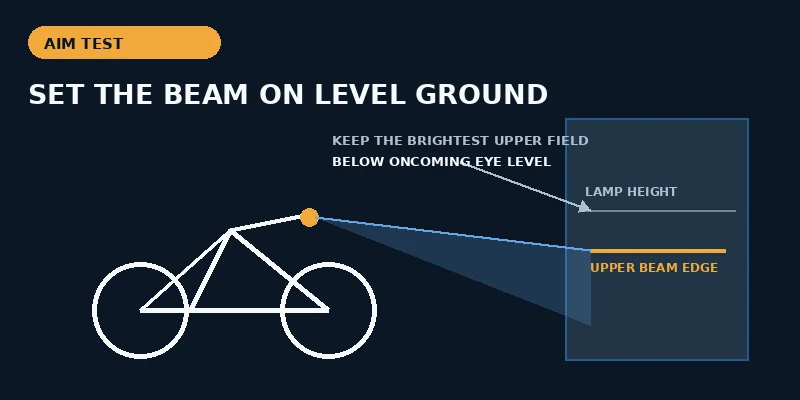
Bike lights for night riding should be aimed on the bicycle in their normal operating position. There is no universal downward angle that works for every optic and mounting height. A cut-off road light, an open flood and a helmet spot produce different upper fields, so follow the manufacturer’s instructions first.
A practical setup process is straightforward. Put the bicycle on level ground with the tyres at normal pressure and the handlebar straight. Mount the light securely and note the lens height. Face a wall at a measured distance, switch to the intended steady road mode and identify the top of the bright field. Lower the lamp until its brightest upper region stays below the eye level of oncoming users. If the light has a designed cutoff, keep the cutoff level rather than rotating the housing.
Next, test the beam outdoors at low speed. Look for enough near-field light to track the surface without creating a dazzling patch immediately in front of the wheel. Check reach on the darkest straight, edge visibility through a bend and reflections on wet pavement. Pass another person at a safe distance and ask whether the beam is uncomfortable. Recheck the aim after riding over rough ground.
Bicycle LED lights with an open round beam often need more downward aim around traffic. Helmet lights require special care because the beam follows the rider’s head; looking directly at another person points the light directly at them. Dip or switch off the helmet beam when approaching people.
How to Compare High Performance Bicycle Lights with Beam Evidence?
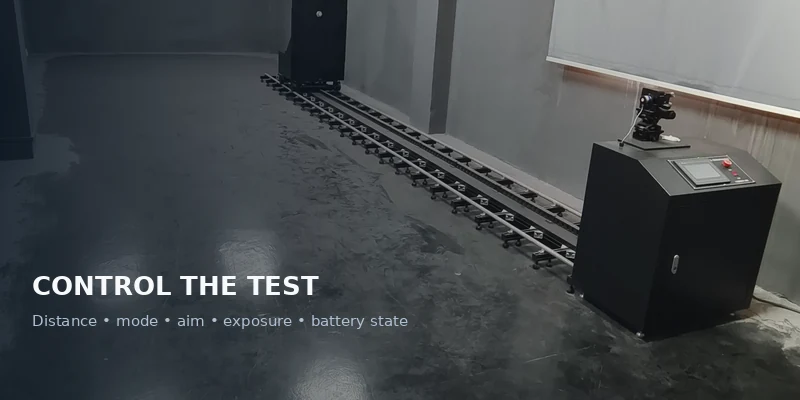
High performance bicycle lights should come with evidence that allows like-for-like comparison. The most useful package includes a lumen or output declaration by mode, a beam image made under documented conditions, lux or candela data at stated positions, a runtime curve, mounting instructions and any applicable market approval.
Use the following audit:
- Confirm which mode appears in each beam image and whether the battery was fully charged.
- Ask for camera exposure, distance, mounting height and scene dimensions when images are used comparatively.
- Compare the hotspot, spill, cutoff, near field and edge uniformity—not just the brightest pixel.
- Review beam reach together with riding speed; a long but very narrow patch may not suit bends.
- Check whether the output steps down after start-up because a peak beam photo may not represent the full ride.
- Confirm that the bracket resists rotation and returns to the same aim after removal.
- Separate water resistance, optical performance and legal approval; one claim does not prove another.
- Test the production sample, not only a prototype or rendering.
This evidence is valuable to riders, and it is essential for OEM/ODM projects. Beam requirements should be written as a use case—route, speed, mounting position and glare constraint—before the team selects an angle or lumen target.
What the OH1C-600 85° Bicycle Front Light Specification Tells You—and What It Does Not?
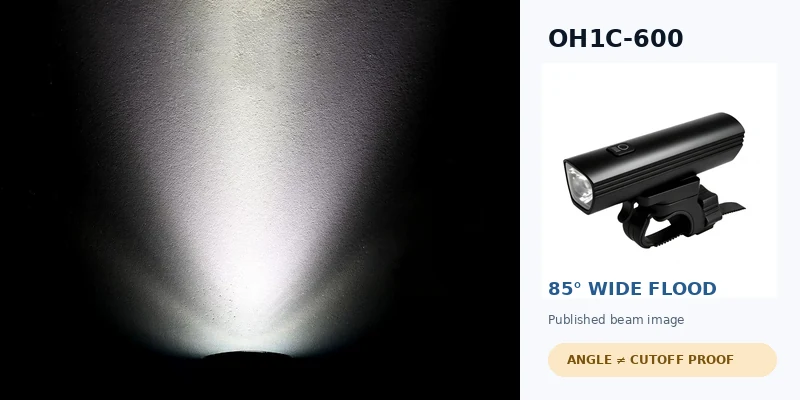
The current CONWICO OH1C-600 bicycle front light page lists a maximum output of 600 lumens, an 85-degree beam angle and a beam distance over 150 metres. The supplied handbook also contains a real beam photograph. These are model-specific facts and provide a better starting point than a lumen number alone.
The 85-degree figure indicates a wide distribution, so the model can be considered for routes where peripheral coverage matters. It does not, by itself, prove an even beam, a sharp cutoff, a particular lux level or glare compliance. The “over 150 m” specification does not state the detection threshold or test method, so it should not be translated into a guaranteed hazard-recognition distance.
The handbook’s phrase “no blind spots” is an absolute claim and should not be published without a controlled beam map or defined field test. A more defensible description is “85-degree wide flood beam,” followed by the published beam image and its test conditions when those are available.
For a buyer, the next step is to request a standardized road image and photometric data for the production sample, then confirm that the 500-lumen high steady mode and mount maintain the required pattern over the intended runtime. This turns a specification into usable evidence without overstating what it proves.
Bike Light Beam Pattern FAQ
What is the best beam pattern for a bike light?
The best bike light beam pattern matches the route. Use a controlled road beam for city and shared-path riding, balanced throw and spill for unlit roads, and a wider flood—sometimes paired with a helmet spot—for technical trails.
Is a flood or spot beam better for cycling?
Flood is better for peripheral awareness, tight turns and slower technical riding. Spot is better for seeing farther ahead on faster, straighter routes. A hybrid can balance both, but inspect its actual distribution.
What is a cut-off beam bike light?
It is a light whose optic creates a defined upper boundary so more output stays on the road and less reaches oncoming eyes. Correct mounting orientation and aim are still required.
Does a wider bike light beam angle always mean better visibility?
No. A wider angle covers more area but may reduce intensity and throw. Uniformity, centre intensity, spill, output and route speed determine whether the result is useful.
How do I stop my bike light from blinding people?
Use a controlled beam where practical, mount it in the intended orientation, aim the brightest region below oncoming eye level, select a lower traffic mode and recheck the aim after rough riding.
Should a bicycle helmet light use a narrow beam?
A relatively focused helmet beam can complement a wide handlebar light on trails because it follows the rider’s gaze. Keep it lightweight and dip it around other people. It should not be the default solution for every road rider.
Do more lumens improve a poor bike light beam pattern?
No. More output can make the same poor distribution brighter, increasing glare or a harsh hotspot. Improve the optic and aim before adding output.
Choose a Bike Light Beam Pattern for Useful Road Light
A bike light beam pattern is successful when it gives the rider enough reach, enough peripheral information and acceptable glare control for the route. Start with flood, spot, hybrid or cutoff as a functional category; then verify angle, beam evidence, sustained output, mount stability and runtime.
CONWICO buyers can use the verified OH1C-600 specifications as a reference point and discuss a target beam requirement for a defined market and riding scenario. To see how beam choice fits a complete setup, continue with the guide to bike lights for night riding and explore the bicycle lights range.